Sunday, 2 March 2014

38. BACK TO THE EARTH.

Hello Potters and Friends,

Lanzarote is one of the Canary Islands off the coast of Morocco, and its most notable feature is that it's covered in black volcanic lava. Every house is painted white, by law, thanks to the artist Cesar Manrique who had a major influence on planning regulations and achieved sympathetic development of tourism from the governing body.
The result is a beautiful black and white landscape, and one that Alan and I love.


We visited there last month with our daughter Rosie and grandson Hector. And I think it's no coincidence that most of the pots I have just taken out of the kiln have been black or white.


I recently saw a photograph of some quite small plates about 5inches in diameter, and they reminded me of the small plates my grandmother served slices of cake on. In fact she called them cake plates. So I thought I would introduce the idea of a plate for this sole purpose into my next exhibition. 


I love making jugs. I used a few brush strokes of oxide to create the pattern on the right-hand jug. It could be a boat or moth or nothing at all, but I liked it so much that you'll see it again, make no mistake. The other two are Grab Jugs (no handles) They are always popular, I can never make too many.


A spot of hand-building. The ends were cut then overlapped. It creates a more oval shape than this photo shows. So here we are.....


The same technique and this one was stamped with two Indian wood blocks that I bought in the old town of Teguise in Lanzarote.


Alan, Rosie and Hector outside the shop


Here's that mothy, boaty pattern again. You may have seen my sweet potato mould I made a while ago. I've never found a better, more knobbly vegetable. The top is an added thrown piece. 


OH WOW COLOUR !  Wax painted on before glazing gives a very rough and ready effect. I dipped them in Tenmoku when the wax had dried out.


This was a complete surprise, but a welcome one. I had painted on small oxide dots before the bisque firing.  (Manganese and copper carbonate) However, when I had dipped it in a glaze called Marguerite and placed it on the bottom shelf of the kiln (the hot spot in my kiln) the dots became streaks. Brilliant. But can I ever achieve this again???

And finally......a moment of madness.


The fishing boat, bobbing seaside pot.
I can only say.....


HAPPY POTTING FOLKS


Mi amigo.


Monday, 20 January 2014

37. GONE COLOUR CRAZY

Hello Potters and Friends,

I sat at the wheel after the Christmas break with the intention of throwing a couple more teapots and tea bowls. The clay was a tad cold in the workshop but with the help of a little warm water the throwing was going well and to plan. I started with the tea bowls just to get me into a nice rhythm.

This was my intention.....


But this was what transpired.........


And not just one........


Thrown as a cup, then squashed, pinched on one side, and then adorned with mini birds, teapots etc.
Before the bisque firing I painted them with underglaze colours. 

I find these small pots of underglaze colour quite difficult to judge because what is painted on the pot completely changes once a clear glaze is added.
This is one that changed dramatically after being glazed.

Before... quite fun.


After....not what I imagined!


But I did manage to throw one teapot.


But I mistakenly picked up Lava clay instead of speckled clay which is why it's doubly speckled!!
Good job my white glaze is very adaptable.
And I cut the spout a bit too low, so a full pot of tea will result in a little bit of spillage from the spout. As I've said before, the tip of the spout should be on a line with the rim of the pot to prevent this. So why didn't I heed my own advice? This is a question I often ask myself.
So from that week's work I found that the only thing I really liked was the outline of two apples that I painted with manganese on the teapot. 
Ah well, you can't win 'em all.

But here are a couple of little tricks I played around with.

Roll a ball of clay in your hand and then, in a circular movement, roll a piece of flat plastic over it.


I used the base of a take-away tub.

And this is the result..


Just like that.
And as you saw, I stuck it on the nose of my bird vase.

And here is a great aid to any hand-builder.


It is very flexible, but at the same time it will not move from the shape you finally put it in. I believe most art shops sell them. I created these two perfect curves by cutting round it. 

And finally, here is my little Russian angel that I made for Christmas. But she'll probably stay out on the shelf for the rest of the year.


HAPPY POTTING FOLKS

KEEP PRACTICING AND
KEEP "EM COMING


Saturday, 30 November 2013

36. BLACKBIRDS, TEAPOTS AND HOLKEN HALL - BUT NOT IN THAT ORDER.

Hello Potters and Friends,

While my kiln was working away on a glaze firing, Alan and I went on a trip northwards for a couple of days to the Lake District.  Just south of Lake Windermere to be exact.  Cold? Oh yes, I should say so, but very beautiful.


And we visited Lord and Lady Cavendish at Holken Hall.
We don't know them personally, of course, but we paid our money and had a good nosey around their castle-like home. 


Below is the vast library where Queen Mary spent many hours hiding from the paparazzi after her son, King Edward VIII, announced his love for US divorcee, Wallis Simpson, and expressed his intention to abdicate the throne in the December of 1936. 


And here is the dining-room where she probably found it hard to enjoy a single mouthful of that year's Christmas lunch.


I hope they remove the enormous floral display before the turkey arrives! Some parts of that could poke your eye out.

But it was lovely to return to our humble abode and have a look at what was waiting in the kiln.

The two teapots that I made in the previous post came out very well. And I've made some small cups to match them.


I have been trying out a much darker green glaze called Northern Woods. 
(Very appropriate to this post, I now realise)


I have been making lots of these little blackbirds and putting them in a plastic lidded container to keep damp for when I need them. They'll stay just as I made them for a couple of weeks – maybe even more if well sealed.


I painted them with manganese to get this bronze/metallic look. And I fixed them on with paperclay slurry. (See previous post for paperclay recipe.)
This glaze shows texture really well.


To create the sgraffito markings I used a sharp pencil. This works better for me than a needle or other potters' tools. I feel that I am really drawing by using a pencil and I never feel that with other tools.


Bits of clay stick in the markings as you make them, but just leave them until the pot dries out a little and then brush them off with a stiff paint brush. 


And finally, my obsession with adding beads to everything is still with me.


HAPPY POTTING FOLKS


Sunday, 3 November 2013

35. THE MAKING OF A JAPANESE TEAPOT.

Hello Potters and Friends,

Having done very little work over the summer, I've got my head down and embarked on some new ideas.
First off, I decided to make a collection of teapots, in the Japanese style. Fruit and herb teas are very popular at the moment and it's best to reserve a teapot for this use alone, in order to retain the true flavours. For myself, I want a small one that holds just two cups for Alan and me when we have a mid-afternoon Earl Grey.

Teapots, quite definitely make the best tea. So here's how I began.


I threw a pot, first as a cylinder then coned in the top just as I would if I was shaping a vase. As you can see I didn't create a gallery for the lid to sit into on this one. This lid will sit inside.
(If you don't have a wheel you can still make a teapot by combining coiling and slab building.)
I put it to one side and then threw the lid (upside-down). I added the little knob later at the leather hard stage. 

And here are the other parts: small spout and a larger one for the handle.


And here is the pot in its first rough state, when I assembled all the parts.


 In traditional style the handle is fitted onto the side of the pot. On both the spout and handle I've cut the bases at an angle so that they will point upwards. It is most important for the tip of the spout to be almost level with the top of the pot. This is because as you fill the teapot with water you'll have tea spilling out all over the table if the spout is too low.

Here's my second pot showing quite a steep angle to achieve this.


This is a different shaped teapot and this time I did create a gallery for the lid to fit in quite snuggly. I threw this lid the right way up and just coned in the knob. 

Also notice the hole in the lid. You may think it's there to let the steam out, but actually it's there to let air in. Without it the tea would struggle to creep out of the spout.

And before I leave these pots drying out I want to give you a tip that I use on all pots that have a join somewhere or other. I've taken to using paperclay slurry to join handles, knobs, decorations etc.
With this you can join clay at any stage of drying out.  Wet to dry, even join dry to dry. It's strong and it works. And as it dries out in your tub you can make the most delicate and fine decorations that tend to stay where you've put them on your work and not drop off or crack in the firing. And what's even more brilliant is that you don't need to buy it, you can easily make it yourself.

Here's how.
1. Take clay from your bucket or new from the bag and soak it in water until it resembles a puree. 
2. Pour boiling water over some ripped up newspaper and leave it to soak, then mash this up (I use an old electric hand whisk) until it is also close to puree. 
3. Add the pureed paper to your clay, but no more paper pulp than around 40%. Give it a good stir and wait for the water to evaporate, then kneed it into balls and bag it up. It's invaluable.

The paper burns away in the kiln and the clay becomes extra strong because of the fine network that remains. 


The little blackbirds here might not have stayed on the rim without it.

I've been testing some new glazes recently and so I've taken to making eggcups instead of test tiles. 


Once photographed and recorded I can put them up for sale, or make use of them in our kitchen.


At my last exhibition I put little heaps of various buttons scattered around the pots, but I'm doing it differently now. Customers get better value buying in batches and I don't get left with odd ones.
Alan found me this lovely picture of tulips that could be printed 8 to a page, and so I'll just sew them on. Fiddly but worth it.

And finally......our grandson Hector experiencing clay for the first time.


If you think that getting a 4 month old to oblige with a hand or foot print is easy......phew!
Lovely soft clay, grandma, feels so nice why don't I grab it and dig my nails right in!!!

We decided to wait another few months.


HAPPY POTTING FOLKS

AND SEE YOU LATER  HECTOR


Sunday, 13 October 2013

34. PULLING HANDLES

Hello Potters and Friends,

The pulling of handles is a technique that a lot of students resist trying. I myself was just the same while learning and would try any other method rather than tackle this very important technique.
So, I'm now going to set out a tutorial to try and give you all the help that you need to fix a good looking handle to your functional pieces.

So get ready........ and........


This is the shape that you roll your clay. It's a good sized carrot. Don't think it's too big for your piece because you're not going to use it all.


Hold it (by the thick end) over a bowl of water and begin gently, and I stress the word gently, stroking the clay carrot, with a wet hand, downwards over and over again. 
My clay is angled for the camera but really the clay would hang down towards the water.
Don't rush this. 
You're coaxing the clay to elongate. Don't pull!! Even though the title of the technique suggests it.
Perhaps it should really be called 'Stroking Handles'. 

Also, note what parts of my fingers are doing the stroking. No finger tips. No knuckles. Just the soft skin between forefinger and thumb.


So now your carrot is a giant's tongue. 

It's flattened out a bit and it's pretty wet but it's looking good. However, as in the previous post, the secret to good handles is attaching them at the right moment. So the top you've been holding is pressed onto a workbench or board and the tongue is allowed to dry for an hour or so.


Examine the shape then cut off your handle at your chosen point. 
Score and paint slurry on the pot as I described in the previous post, then poke your finger nail into the end of the handle. This serves two purposes. 
1. To take a good blob of slurry. 2. To fan the end a little in order to fit snugly on my rounded pot.


That end is now pressed onto the pot.
Just to show how stiff I like my clay to be when I do this, you can see that the handle can stand unaided. 


Bend it over to the shape and size that you want then cut off the excess and tidy up all the joins making sure there are no gaps.


And here it is. 
Circles painted with manganese oxide on bare clay (no glaze). But a white glaze on the inside and on the rim.

Give it a go. If it fails the first time you can take it off, smooth the marks on the pot, and just start again.

Happy Potting Folks


Sunday, 1 September 2013

33. GETTING A HANDLE ON IT ALL.

Hello Potters and Friends,

Over the past couple of weeks I've gone from this......


The beautiful isle of Jersey, off the French coast.
To this.......


My chaotic workshop – but ready for action!!

And as the title of this post says, it's handles that has dominated the workshop all last week, so I thought I'd show you how I tackle them.


Having rolled out your fresh clay, resist touching it for at least an hour, maybe even longer. When the clay is soft it will never form a good handle.  It's hard to hold back from getting on with it when you've got your cups sitting there, but waiting for the clay to stiffen up is the whole secret of success.


Score marks on your cup or jug where you want your handle to join.


Dab on some wet slurry from your slop bucket.


Press on your handle and cut off the excess. My handle had been shaped by pressing and running my finger along the length of the roll to form the middle dip.  But I did this after the clay had stiffened. If  you do it when the clay is freshly rolled, it will be lumpy, bumpy and bendy and you'll have to start all over again. 


I sometimes use a tool to create a decoration. This adds an extra press to the join to ensure good adhesion. 


Two of the 'Fine and Dandy' collection.

Of course, that isn't the only method.


 Next week I'll be 'pulling' some handles for some large mugs. But that's another story!

But now, to go from this pure white porcelain to the opposite end of the spectrum. Not to mention the opposite end of the workshop, because I have bought some black clay. It's incredibly messy and stains everything, including me.


It doesn't look too bad in the picture but, if you try some do be careful where you roll it and wash all tools thoroughly.  

During the handle-making last week I was desperate to make a couple of different things just for fun.


Of all things, a business card holder and a holder for the kitchen sponge! You can see how much I enjoyed this by how much decoration I lavished on them. Picking out glazes might take some time too.

But, hopefully, all this work will be in the kiln this week and as our English summer continues I will be out in the garden watering like mad. 

WARWICKSHIRE GARDENING NEWS

I've grown two new plants from seed this year that have thrived in our unusual and unexpected heat.


Black Basil.
Very large leaves and very aromatic.


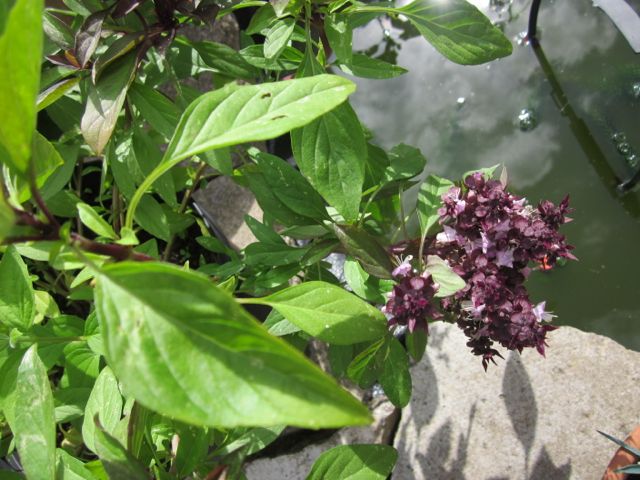
Vietnamese Basil.
Big clusters of purple flowers amongst bushy green leaves that taste of aniseed.  Brilliant in salads.


Very small Chinese lantern plant but held high by a stately earthenware eye protector on a stick. 


And finally, good use made of our bird-table that was deserted for the free lunch that we call our mixed borders and veg patch.


HAPPY POTTING FOLKS