Saturday, 19 August 2017

53. I LOVE MY SHIMPO ASPIRE WHEEL.

Hello Potters and Friends,


Here it is my new throwing wheel! It looks a little more messy at the moment because it has been well used since I bought it. But as it has been a great success for me I wanted to let you know all about it.

I have to say that I was initially in two minds about it as it looked, not just smaller than my big Shimpo Whisper, but it didn't appear to be very robust — I couldn't have been more wrong.
Also I can lift it and take it into the garden or place it anywhere I choose provided it stands on a wobble-free table. 
It has certainly released me from my basement workshop and given me hours of daylight.

So I'll give you a closer look.


Firstly, the controls. Red on/off switch and another that lets you choose clockwise or anti-clockwise spin — useful for left-handed throwers.


Next the batts. These blue batts look a bit flimsy don't they? Be assured they are good and strong and you get two.  As you can see they press down on the two bolts on the wheel-head and are quite secure. Sometimes I have to rub a little bit of Vaseline in the holes to help press them in because the holes get a bit clogged up with dry clay.

The wheel will take up to 9kg (20 lbs) of clay, so considering that I make large mugs with only 1lb of clay I think it's safe to say that it will satisfy most needs.


By having these easily removable batts I can make large or small flat dishes, lift the batt off the wheel and leave the dish untouched until leather-hard. This is brilliant for me as I make lots of flat dishes and plates that remain flat during the firing process. My warping days are gone.


I make a lot of butter dishes and garlic keepers and I like them to stand well together without any wobbles. 


At my last Open Studio sale, flat plates and dishes lined the front of my table.

I bought my wheel at Potclays in Stoke-on-Trent, UK and the cost was just over £600. This is half of the cost of a normal Shimpo wheel. But not only does it have all the benefits that I have already mentioned but the fact that it is so easily transported meant that I was able to give throwing workshops in the summer. 
I was invited to travel to an artist's studio where some keen would-be potters could try their hand on my wheel as well as learn the art of hand-building.

So this little wheel has opened up something new for me to consider in the future.

If you'd like to see one in action then go to You Tube and see Simon Leach testing one out for his workshop. 

HAPPY POTTING FOLKS


Sunday, 5 February 2017

52. A COOLING DOWN PERIOD

Hi Potters and Friends,

Well, coupled with the temperature here in England well below zero this winter, it's also been a bit chilly in my workshop of late. The controller on my kiln just gave up the ghost and said... I've had enough!   I was in the process of firing some commissions at that time but when your tools let you down all you can do is quit.
Here's a peep at the problem.


Quite frankly I was terrified. I'm not an electrician and neither is Alan but with the help of Tom from Potclays Supplies who sent us a replacement with coloured tags in the appropriate places, we fumbled our way to success. So with the manual in hand I re-programmed this unfamiliar box, (all programmers had been up-graded about 5 years previously) and with slight fear my commissions were re-packed in the kiln.


Pots made for Chrome Yellow Art Supplies, Leamington.

If you've seen my yellow glaze in previous posts then you can see that these pots came out a lot darker yet brighter than normal. I deduce from this that the kiln is under-firing. Glazes generally pale in higher temperatures. I've yet to test this theory! 

So what could I do in the meantime..

Before all went...cool I experimented with a technique called inlay. If you see the previous post you can see the fabulous inlay work of American potter Michael Kline. This method is about layering one coloured clay onto a contrasting clay, then a lot of scraping back. I threw everything at this test piece and I can honestly say that it is more difficult than I thought.


Ok, but more work required.

Incidentally, I used a wooden picture frame as a mould. I laid the rolled-out clay on top and then - with a wooden board underneath - I dropped it on the floor. The clay drops into shape straight away. Good trick.


But during my enforced rest I could do other things this winter. I have been painting on more pieces of my WWII ammunition box.


I've bought some heavily grogged black volcanic clay to try hand-building again. Very satisfying but it rips into your fingers somewhat. So I used the edge of a clam shell to create the grooves.


But the most fun is larking about in the park with my grandson, Hector. Can't beat it.


I've enjoyed having this time out and I really believe it does you good. 


TAKE IT EASY FOLKS


Saturday, 1 October 2016

51 INLAY WORK AND OTHER THINGS.

Hello Potters and Friends,

I'm sorry not to have written a post for a while, but now that the holiday season has come to an end I'm back up to my elbows in slurried clay and new ideas! Like this.....

Take a look at this wonderful piece of art from American potter, Michael Kline.


This is a stoneware clay plate inlayed with porcelain. A fantastic piece of work. Michael puts videos up on his Facebook as well as Periscope and I've watched him doing this technique several times in order to give it a go myself. However, my attempt is in the kiln at this moment which is why I've chosen Michael's perfect plate as the finished example. 
So this is how he does it....

First, stamp a pattern on your leather-hard work making sure you have reasonably deep impressions. 


I have very few purpose-made stamps, in fact only one actually, so I used bits of lava from Lanzarote, shells from the Kent coast and even an old cheap ring that was meant to resemble something that Princess Diana got engaged with. This gave me perfect flower shapes. (Must hunt the toy shop for more little girls' trinkets.)

Now we're ready for the porcelain. 


I added water to some soft porcelain and mixed it until I had quite a smooth, watery consistency. This is important as the first coat needs to soak into all the nooks and crannies.
After this you can use a slightly thicker porcelain and keep brushing it on until the pattern almost disappears and the surface looks smoothish. 
Now, let it dry before tackling the exciting bit.


With a sharp tool carefully scrape away at the surface and soon you will see the white pattern emerging. My clay isn't very dark so when this little beauty comes out of the kiln I suspect that the contrast between the two clays will be a tad disappointing, but this is my first attempt, from which I'll learn. Hopefully.  Then fire as usual and dip in a transparent glaze. I'll show you this fired cup next time.

So, what else is new in the workshop?  Before the summer I was glazing everything blue. (see the previous post)  But since the hot, hot days we enjoyed in August I've found myself mixing up the brightest of yellows. 


And as you can see, I still love working with my wax resist technique.


Bright colours, and especially yellow, seem to be loved by everyone this year. Lots of sales.

Here's a photo of the bottom of our garden from last autumn. It backs onto a huge field, and beyond that, a water-meadow that slopes down to our River Leam. 


A little bit colourless you may think, but no... from this open space our daughter Rosie has collected blackberries, walnut leaves, wild marjoram, nettles, grasses and sedge. And this is what she has been working at.


'Meadowsweet Yarns' by Rosie Bill

All natural dyes picked from our water-meadow. Stunning colours Rosie, I like the yellows best — but then I would! Her Etsy shop should be up and running this winter. 

Sometimes we like to give ourselves a treat and Alan has just bought himself a wonderful 'F' Irish Whistle. It's red, an unusual colour for an instrument, but he only has 8 or 9 silver ones in the box labeled  'Alan's whistles'. And, as he said, it's really a birthday present to himself. What will I buy him when he celebrates... next March?? 

But I can't talk because I have just bought a little expensive something this morning.


Hows about that eh?? 
It's still in the box but when I get it out tomorrow it is going to transform my working life! You can perhaps see what it is but it's a bit special. 
It'll take me out of the darkness and into daylight. Next post will have an in-depth review of this cheeky little piece of equipment.


HAPPY POTTING FOLKS 


Sunday, 22 May 2016

50. SINGING THE BLUES

Hello Potters and Friends,

On reading the title don't think for a minute that this will be a sad post. In fact I couldn't be jollier.
I'm still very much in love with my wax resist technique (described in the previous post). I've been creating new designs and logging them in my sketch book, as it's so easy to forget once a pot has been sold.
But I'm very pleased to have rediscovered some of my older glazes that I'd put the lid on and shoved to the back of the workshop. I thought that I would possibly never use my bright blue glaze again because it was fiercely bright and not to everyone's taste, but after I'd painted on the black designs I thought immediately that blue was an obvious choice.


I also used a heavily speckled stoneware clay to add a bit more interest because the speckles would burn through the glaze.


So the glaze that I thought was too bright for any future use was now transformed to 'just right'.


And here's a thing....
I painted this teapot (below) with a light green underglaze. I intended to wax the pattern as usual and then dip it in a white satin glaze.


However, I decided instead to just glaze it, as is, and see what would happen to the pattern.  


A very surprising result! A sort of tan colour verging on lilac in places. I'm tempted now to try other underglaze colours.  A kiln opening will always produce a few unexpected results. But I'm more amazed these days to take out a pot that looks exactly as I intended it to be. 

So in about 4 weeks time I'll be opening my doors for the Warwickshire Open Studio Exhibition. On the same weekend, 18th June, we also have the Leamington Peace Festival. It'll be a very busy weekend in Leamington Spa.


Jephson Gardens, Leamington Spa.


HAPPY POTTING FOLKS


Saturday, 20 February 2016

49. WAX RESIST

Hello Potters and Friends,

I was going to entitle this post 'I Can't Resist Wax Resist' but, you know, I managed to resist.... No seriously, I have been using this technique a lot recently and I am loving it. This is how it started;


'Hare over the Moon'

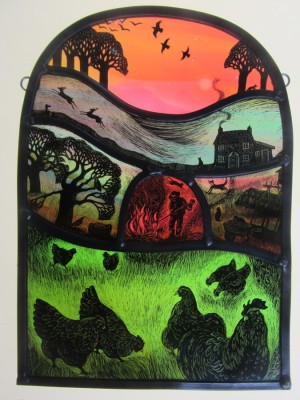
I saw the fantastic work of stained glass artist Tamsin Abbott (below) and I wanted to create something of that style on my pots. I finally settled on the wax resist idea.


Autumn Bonfire


A bottle of wax resist can be bought at all pottery suppliers and is applied to bisque ware with a brush. Most potters use it to coat the bottom of pots to resist glaze while dipping. But I've gone a bit crazy with it and will soon be ordering a new bottle!

My Method
So what I've been doing is painting my design onto greenware with an underglaze — bisque fire it — paint over the design with wax — let it dry — dip the pot in the glaze and the design should remain unglazed. If some little drops of glaze should stick to the wax then you might be able to just blow them off or soak them up with a dry brush.

It's almost impossible to take wax off bisque ware, as it soaks in immediately so be very, very careful. Where it touches is where it stays!

So here are some examples from my last kiln opening.


'Blue Hare'


I used one of my grandson's crayons to dot the cups, then painted over the red flower with wax.


'Thistle Dish'

No underglaze colour on this one. Just a quick squiggle with the wax brush, then dipped in Tenmoku. 


'Red Leaf Bowl'

Love this one. I painted on a red glaze. Then, when bone dry I carefully waxed it, being careful not to disturb the powdery glaze. Then I continued with a black glaze. And couldn't resist (sorry) a couple of dots.

Work in progress — the early stages......


Painting on greenware before firing.

Oh hell, I might have gone a bit too fancy with this one!  I told myself to keep the designs simple.  It'll probably take me a whole morning to wax it. 


That's more like it. 

So give it a try and have fun with it.

Cheers !


HAPPY POTTING FOLKS


Saturday, 31 October 2015

48. MY VISITOR FROM JAPAN.

Hello Potters and Friends.

Yes, can you believe it, I had a visit from Sachiyo Kawabe who is a very well known potter from Mashiko, just north of Tokyo.


She has family in England which was the real reason for her visit, but I felt very fortunate to have met her. She brought some of her pots to show me and left me with this excellent cup that I use for my tea every morning. And she picked out this painted bowl of mine to take home.

Mashiko is known as a pottery town and was the home for many years of famous potter Shoji Hamada. It was also here that Bernard Leach was first introduced to Japanese pottery and became life-long friends with Hamada, whom he brought back with him to work in the Leach Pottery in St Ives, Cornwall.

Sachiyo and her husband built their own kiln - called a climbing kiln - which only gets fired once a year. Fingers must be well and truly crossed at that kiln opening. 


This is an example of a climbing kiln in Mashiko.

Unfortunately it was destroyed in the Japanese earthquake 2011, along with all her pots for a big exhibition. It is now rebuilt but what an experience. One's livelihood put back months in just a couple of seconds!
Should my small electric disappear into the ground I'm fortunate enough to be able to ring Potclays Ltd to send me a replacement. 

But on to my recent making.....
I have discovered a sort of new technique that I'm rather pleased with. Firstly here is the end result.


I love the mixed glazes but I'm more pleased with the mixed clays.


I've never got this banding right before. It has always ended up a bit muddy. So here's the secret.

No mixing clays beforehand. Centre your one main clay on the wheel first, then add your contrasting clay as in the picture. I've got a bit of a Union Jack thing going on here by the look of it. Not intentional. 


The more times you 'cone up' the more bands of colour you'll create. Now, press down into the centre straight away and pull out to make your pot as usual.  Of course, the bands disappear at this point and you can't see much until you scrape away the surface when you 'turn' the pot at leather hard stage. But all becomes clear in the final firing. Have faith, it will happen.

And finally, just out of the kiln, is the last of my commissions. Japanese teapots (kyusu) and cups (chawans). Sachiyo looked them over just before I glazed them and I'm pleased to say that I took her enthusiastic nod as a double thumbs up!


HAPPY POTTING FOLKS

Saturday, 29 August 2015

47. TO COMMISSION OR NOT TO..........

Hello Potters and Friends,

Couldn't resist the Shakespearian flavour to the title of this post. My son is working with Benedict Cumberbatch in 'Hamlet' at the Barbican at the moment, so it's part of my world right now.
Crazy times, he tells me. 'Sometimes it's been more like being in a rock concert than a play'.
Indeed, as an actor myself, I've never witnessed such hysteria over a piece of Shakespeare. However, Hamlet is now being seen by people who possibly didn't like having to study Shakespeare at school and who firmly believed they would never have to encounter it again. I applaud Mr Cumberbatch for that.

But on to those commissions.
A successful Open Studio Exhibition always produces requests to re-make the popular pots that have already been sold.
Repeating a piece of work that was a complete one-off, possibly even a result of a mistake, is quite a challenge.

I know some makers who will not take commissions at any price, but I somehow always find myself saying, 'Yes of course I'll make you another one'.  But adding, ' It'll be exactly like that one...... but a bit different'.

So I've made a start.


Waiting to be bisque fired.

 The painted pots on the shelf at the back were the most popular. Here's the sold one.  


Hare over the Moon

Hares always seem to be very popular, but difficult to make them not look like elongated rabbits.

I've been asked to make a side-handled Japanese teapot for an actor friend. So here's the first one drying out in the workshop. I always make two – just in case.


When making anything involving adding handles or spouts, I like to be certain that the fix to the pot is as secure as I can make it. So I made a small amount of paper clay for the purpose. This is the strongest and best sure-fire slurry for the job.


Rip up newspaper and pour on boiling water. When cool, squeeze it out and add it to some liquid clay from your slurry bucket. Roughly, 30% paper, 70% gooey clay. Then whizz it all together with an electric hand whisk and you have the perfect clay glue.


Now doesn't that look good?

Most of this I put in a sealed container to keep wet and some I dried out and kneaded into a ball to be kept for other uses.

Alan and I took on a fun project during the exhibition before my favourite pots disappeared. We took some photographs to be turned into greetings cards by our local printer.  


They are A6 size, blank inside and very colourful.


Inside my greenhouse.


The Oystercatcher


Goosey Goosey 

They are all for sale at £2 each so if you'd like any, just post me a comment or go through contact me on my website at www.sheilagraham.org.uk


HAPPY POTTING FOLKS