Sunday, 1 September 2013

33. GETTING A HANDLE ON IT ALL.

Hello Potters and Friends,

Over the past couple of weeks I've gone from this......


The beautiful isle of Jersey, off the French coast.
To this.......


My chaotic workshop – but ready for action!!

And as the title of this post says, it's handles that has dominated the workshop all last week, so I thought I'd show you how I tackle them.


Having rolled out your fresh clay, resist touching it for at least an hour, maybe even longer. When the clay is soft it will never form a good handle.  It's hard to hold back from getting on with it when you've got your cups sitting there, but waiting for the clay to stiffen up is the whole secret of success.


Score marks on your cup or jug where you want your handle to join.


Dab on some wet slurry from your slop bucket.


Press on your handle and cut off the excess. My handle had been shaped by pressing and running my finger along the length of the roll to form the middle dip.  But I did this after the clay had stiffened. If  you do it when the clay is freshly rolled, it will be lumpy, bumpy and bendy and you'll have to start all over again. 


I sometimes use a tool to create a decoration. This adds an extra press to the join to ensure good adhesion. 


Two of the 'Fine and Dandy' collection.

Of course, that isn't the only method.


 Next week I'll be 'pulling' some handles for some large mugs. But that's another story!

But now, to go from this pure white porcelain to the opposite end of the spectrum. Not to mention the opposite end of the workshop, because I have bought some black clay. It's incredibly messy and stains everything, including me.


It doesn't look too bad in the picture but, if you try some do be careful where you roll it and wash all tools thoroughly.  

During the handle-making last week I was desperate to make a couple of different things just for fun.


Of all things, a business card holder and a holder for the kitchen sponge! You can see how much I enjoyed this by how much decoration I lavished on them. Picking out glazes might take some time too.

But, hopefully, all this work will be in the kiln this week and as our English summer continues I will be out in the garden watering like mad. 

WARWICKSHIRE GARDENING NEWS

I've grown two new plants from seed this year that have thrived in our unusual and unexpected heat.


Black Basil.
Very large leaves and very aromatic.
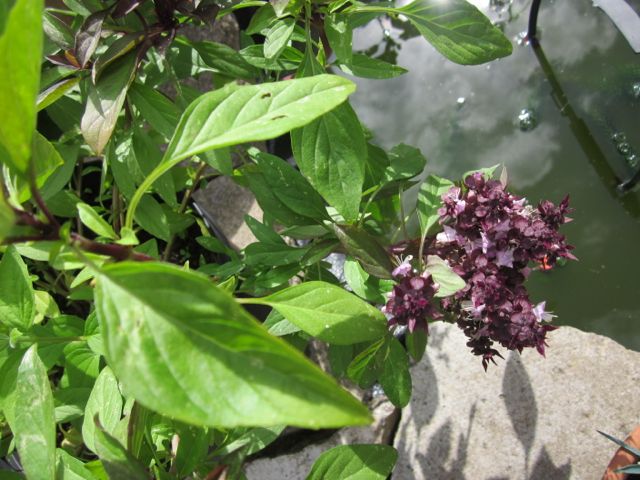


Vietnamese Basil.
Big clusters of purple flowers amongst bushy green leaves that taste of aniseed.  Brilliant in salads.


Very small Chinese lantern plant but held high by a stately earthenware eye protector on a stick. 


And finally, good use made of our bird-table that was deserted for the free lunch that we call our mixed borders and veg patch.


HAPPY POTTING FOLKS


Friday, 26 July 2013

32. THE OPEN STUDIO EXHIBITION.

Hello Potters and Friends,

Participating in an Open Studio must qualify as one of the most enjoyable exhibitions of the year. There's no packing up and travelling. Everything is to hand and you can (if you so desire) spend weeks setting it up.


One of my displays with paintings by Kathy Webster.

Yes, I know it looks a bit thrown together this year, but that was my cunning plan. 
I recently visited an antique/junk shop near Birmingham and it was one of those wonderful emporia that was so crammed full of bits and pieces that you had to really rummage through. And how pleasing it was to find a little gem that must have been overlooked by everyone else.
And that was the effect I was after for my display, and I spent a lot of hours creating this haphazard chaos. 
I filled a table with lots of kitchen ware then scattered amongst it porcelain buttons, gift tags, pot plants and some CV's and business cards. 


And I made good use of my French milking stool.


 So now's the time I like to make a note of what was popular and what was surprisingly not!

Top of the popular list were my porcelain cups.


People particularly liked the simple cylinder shape as well as the painted dandelion design.
 I called  them 'Fine and Dandy Cups' which I think also helped to make them attractive.


The buttons were those surprising little objects that, once discovered, had to be bought.


All of the painted designs caught the eye and were the first of the purchases.


And the bolder and simpler the better.


But when this little chap put in an appearance, he was definitely the most ooo'd and ah'd over!


 My 3 week old grandson, Hector.

And while waiting for Hector to arrive, Rosie knitted me some warmers for our
 'Cosy Cups'. 


I made the cups with an indent round their middle, and I left the indent unglazed so that the wool wouldn't slip when the cups were picked up. 

But to my great surprise the bottle pots I made (in varying sizes) were completely ignored. 


So I've given them a make-over and they now have pride of place on my mantlepiece.


And finally.......yes, another photo of Hector with his mum Rosie.


HAPPY TIMES
HAPPY HOLIDAYS
AND
HAPPY POTTING FOLKS 


Wednesday, 29 May 2013

31. A MONTH AT HOME AND AWAY.

Hello Potters and Friends,

I just love this photograph.


 Widows of India.
The Bradley Guest House 1912, Cheltenham, Gloucestershire, England.

A Miss Madge Bradley bought this large house at the turn of the century not to live in but as a refuge for widows returning from the colonies of the British Empire. The once elegant wives of high society, left almost penniless by the inheritance law at that time, were forced to return to the UK and try to make a new life for themselves. As you can see they were keen on acquiring pets!

Alan and I were in Cheltenham to see a performance of the brilliant Scottish band 'Lau', but what a treat it was to stay in this magnificent guest house and be looked after by Madge Bradley's Great Niece and Nephew. 


Alan, on the same steps, striking a dashing pose!

 And then a few weeks ago we crossed the channel to France. 


The French Organ-Grinder of Orbec entertaining in the market.

Other people's discarded objects hold a great fascination for me and when in France I am drawn to all the second-hand stalls in the markets. And this month I found a great wee object on which to display my miniature pots.


This little oak stool, (costing 5 euro) is only 6 inches high and, I hope, will look more interesting than my usual white block that is traditionally used to add varying height on a table of pots. I've also collected old battered kitchen utensils to add interest to my display of casserole dishes and mixing bowls. I wouldn't be surprised if I first get an offer for the stool or the rolling pins!

You might like to see how the finished casserole dishes turned out that you saw me making in the previous post.


And my love of porcelain will never wane.....


I pressed a bit too hard when fixing the handles but found it produced a variation on the handle that I really liked.  


I added little bobbles to emphasise the dent.

The top of the sugar bowl I made with the 'gallery' on the inside of the lid.


It's a dumpy little pot so it suits the edge of the lid extending over the rim of the bowl.
As opposed to this one.....


But this one is a bit more sophisticated so the lid balances snugly on a 'gallery' built inside the rim of the pot. 


The whole form makes an oval shape that is not broken by an over-lapping rim.

Recently, I was asked to make a jug that gave the appearance of the inside glaze pouring out over the rim. This proved more difficult than I first thought.


Pot-bellied custard jugs

Firstly, when making a jug, I would always make sure that the lip is a good pourer. This is done by making the edge of the lip quite sharp as I draw my finger over it to create the shape. It is so annoying to have a good looking jug that drips milk or custard all over your table when in use. I'm sure you can see the problem straight away – as I poured the glaze out, it refused to drip! Therefore I was forced to manufacture the drips by squirting the rim with a syringe.
Secondly, I couldn't glaze the outside of the pots because, when the two different glazes meet, the colour of the drip would completely change and not appear to be running out of the jug. So the left-hand jug I painted with manganese oxide circles and the right-hand jug has stoneware clay mixed with purple oxide and porcelain to create a swirly effect as I threw it. 
I hope you like one of these, Katie.

So now, with all my bits and pieces, and pots and pans collected together, I look forward to putting them all on display for our Warwickshire Open Studio Event that takes place in the first two weeks of July. 


'Pots, Paint and Jewellery'

Look out for our brochure and come and have a cup of tea with us.

And as a rousing chorus of La Marseillaise was sung in our village of Tordouet to celebrate the liberation of that region in May 1945...


..... à bientot and happy potting folks.


Wednesday, 17 April 2013

30. MAKING FOR THE KITCHEN.

Hello Potters and Friends,

Our summer exhibitions are just around the corner starting in May, so over the past couple of months I've been doing some serious thinking and drawing in order to create new work. I want to surprise people by putting out a different style, and hear them say 'Oh, I haven't seen this before'.
So, my workshop is producing a lot of kitchenware at the moment. I've always produced cups and jugs but this year I'm really going for it!
And to begin here are two pestle and mortars.
First the conventional type.


Stoneware. Unglazed on the inside and on the end of the pestle in order to get a good grinding contact. As the pestle is so chunky and solid, I left it to dry-out for about a week before bisque firing. Any moisture lurking in the middle could blow the whole piece open.

Now for something a little bit different.


Stoneware. A flatter, shallower bowl but with a pestle that resembles a door handle. 

I saw something like this on Nigel Slater's TV cookery show but have since discovered that it was made for him by a potter who has since stopped selling them. So, here we are. It works and it looks great. I haven't used this turquoise glaze before but I'm beginning to love it.

So next up comes painted cereal bowls.


Painted with black and blue stains before the bisque firing, then transparent glaze inside and my smoke glaze outside. I hope to catch the eye with these. 


Potted herbs from the supermarket take up too much of my valuable work space so this is my solution.


Alan suggested he used his drill to create the large holes that I wanted. I was horrified! I really didn't think it would work but....it pains me to say it....I was wrong. At leather hard stage it worked like a dream. 

Out of a bisque firing yesterday.


Small casserole dishes - oven to table - as the cook shops like to say.

And here's how I made them.


Straight sided cylinder with a rolled rim. (See post 28). Cut in at the base to give a nice finished look.


The handle. I threw enough clay to make two handles - the first being thrown off the hump, as small amounts of clay are quite tricky to get centred.


Mark the clay with a finger to indicate where to cut it off.


When pulling my wire through I always bring one hand round to meet the other as the wheel very slowly turns.

When both are leather hard I cut the handle to the length I want, then cut this sort of shape...


This will then snuggle nicely with added slurry onto the rounded side of your pot. For added security I press a very thin worm of clay around the join.

And to finish here is some  
WARWICKSHIRE NEWS

We have a tea and coffee shop in town called VINTEAS. They take you back to a genteel time when cups and saucers were the tea drinkers' preference.


And last Friday lunchtime The Gallery Trio entertained us with a little bit of 30s and 40s music, with a touch of classical thrown in.


Delightful.


HAPPY POTTING FOLKS.