Saturday, 4 August 2012

19. The Price is Right.

Hello Potters and Friends,

Well, I said I'd discuss the pricing of my pots, so here I go.
It's a really difficult subject but I think it's important for us all to share our points of view on the subject. So this is how I try to tackle it.

Firstly, I think we all would agree that we shouldn't over-price, nor under-price our work but aim for a fair price.
I make, mainly, functional pots, i.e. mugs, bowls, jugs....what Simon Leach calls "repeat ware".
I also make pots that are individual  - the one-offs.  So I have two different types, two different pricings.

I make the 'repeat ware', as the name suggests, in batches and can throw them on the wheel fairly quickly.
People tend to buy mugs and such-like tableware in sets, so it makes sense to bear this in mind when setting a price. The acid test, as with all pricing - is, would I pay this amount for these cups?


I sell small coffee cups at £7 or £7.50 each.  The spoon rests (front of the table) £5 each. So a set of 4 cups is £28 or £30. To my mind, that is about right. If I raise the price people might go away with one or two at most. Or even worse, go to their local store and buy mass produced crockery.
Price is also important in another way too. People want to feel comfortable as they wander around your studio or showroom. We want them to think that they've made a very good choice. This is the right place for them.  Have you ever found yourself in an expensive shop, quickly realising that there is absolutely nothing you could afford? But once in, you feel trapped. It can make you go a little cold sometimes, and getting out of the door is all you can think about.
But a simple solution is to visit lots of other pottery shows and check out their prices.

Some people have tried to encourage me to put up my prices on my functional ware. But I've seen the results of over-pricing. There has been a drop off of sales and a build-up of unsold work, which inevitably leads to a stagnation in the workshop - not to mention a dip in reputation.

But the one-off individual pots are different.  I don't make 20 an hour. As everyone is a new product, there is more experiment and creative thought involved, as well as labour. Inevitably, the price of these pots reflects this.

But the important thing is to keep potting, keep learning and keep up the enthusiasm.

But now, back to this week. Mugs are still very much high on my agenda, and it's been a dozen handles in particular.


I had a bad start working with clay that was far too soft. I couldn't get the handle to retain its shape, it flopped about, it split and finally I had to scrape it off the cup and start again. 
I took some fresh clay and wedged it up good and proper! I rolled out my handle and left it on newspaper while I had a cup of tea. Catching the clay at the right moment is crucial but my advice is keep testing it and don't be tempted to roll out too thin. Firstly it will look like you've been mean with the clay, and secondly, it's more liable to show cracking as you bend it. 


Before fixing this one on a coffee cup, I was able to decorate it with a toothed tool.

But it hasn't been all work and no play. And I even got Alan away from the Olympics on TV.


Here we are with the flamingos at Peter Scott's Wildlife Park, Slimbridge, Gloucestershire.


They know how to show off to the visitors!


Rosie, with her flamingo red hair. I love it!


Bye, for now 
and
Happy Potting Folks


Saturday, 21 July 2012

18. Customers Know What They Want.

Hello Potters and Friends,

Well, I'm back, and raring to go!! And about time too, I hear you cry.
Alan and I had a great holiday in rural France in June, and the Warwickshire Open Studio fortnight has just finished. So, after quite a long absence from my basement, I'm pleased to be up to my elbows in clay-slop again.
So first, the Open Studios; a great success for all of us. I had a varied amount of pots so it was interesting to see what people liked most.


I'm not sure if it was a good idea to use a black cloth for this display, even though most of the pots were white. Most of what I sold was presented in other parts of the studio.


My daughter, Rosie, at our private view.

But looking back over the event, it's good to take stock of what was most popular.


Without a doubt, the grab jugs won hands down.

I find that jugs are always popular, but these handleless ones - used for cream in the 1930's - just caught everyone's attention. 
Also, the large bowls that I've been hand-building for some time never lose their appeal.


They're about 12 inches in diameter, with roughly sprayed glazes over copper oxide. But the comments are mostly about the ragged, ripped edge.
Cups and mugs are another good seller but I obviously didn't make enough as I have to add another 12 to my commission list.

Some artists don't like taking on commissions, but I have to say that I enjoy being forced to think along lines that have certain constraints. I find that it brings out new ideas that I wouldn't have considered.

Here are a couple of examples....


Stage 1 of kitchen utensil pots. 8 inches high, 5 inches diameter.

No, never would I have thought of this without being asked. Nothing too big, ethnic look, white glaze with maybe a touch of oxide. 
How I enjoyed making these. I rolled out the clay, then wrapped it around a tube - any cylinder shaped object covered with newspaper to prevent sticking will do - gave them a bottom, decorated with slip, a couple of holes and marked with the end of a chopstick. They could also be vases, and why not?

  
Cups, after being turned.

I was asked to make some cups a bit taller than I have previously. I had to re-think my usual bellied shape, and I wanted to avoid making them look like any ordinary cylinder.
After a good hour of drawing I came up with this and I'm really pleased so far. Please God, don't let me ruin them all with a terrible handle.

Now, here's something I could never have anticipated!!


Miniature Salt Pots.

I displayed some of my small test pots along the back of a shelf to show how I test glazes and oxides before using them on the proper pots. Before you could say 'Pass the condiments, please" there was a sudden rush to buy them and even to ask me to make a whole bunch more to be used as salt dishes. Brilliant. Objects that I no longer had a use for, turned out to be much needed vessels for the table. 

But all this production this week has filled my damp cupboard to bursting point. So, off to the shops I went, never mind the clay-splattered trousers, and picked up this little 4 drawer beauty for less than £20.


It's perfect for smallish pots, and takes up very little space in my crowded workshop.

In my next post I'm going to talk about that very difficult subject.......how do we price our work.
I'll try to explain my thinking - which Alan claims is a total mystery!!!! 

Happy potting folks.


Saturday, 2 June 2012

17. Plays and Players

Hello Potters and Friends,

Last week Alan and I went to the cream tea, rolling hills of Devon, and Alan shared a pint of beer and a few tunes in a pub called The Grampus Inn, in the tiny village of Lee.


Click on the arrow, top right, and you'll hear Alan playing 'Joe's House'
He learnt the tune at the famous Burwell Bash workshop, run by the great whistler, Brian Finnegan. 


Early evening in Lee. Martin, Diana and Alan en route to the The Grampus Inn.

But only the week before we were in a very different place! The heart of London amid Jubilee madness.


Here I am - proud Mum - outside the Duke of Yorks theatre.

Our son Leo (who I introduced to you in my Christmas post)  opened in the play "POSH" in the West End after a successful run at the Royal Court Theatre. The play takes a hard look at members of our present government, when they were riotous, young cads at Oxford University. But there are a few songs and a lot of laughs along the way, and hardly any empty seats.


Leo is second from left looking very fierce. It's wonderful to see him looking so dressed up.


So, any potting in this post, I hear you cry? Well, no, not really. We've been rather too busy enjoying ourselves. 
But I have been getting my hands dirty. Not in clay but in muck and soil.


Our Vegetable Garden.

Alan made the raised beds, then we covered the surrounding paths with bark. I'll be growing tomatoes, kale, lettuce and green beans that are all ready to go in the greenhouse.
But, although the summer has arrived later than usual in England, our garden looks more colourful than ever. 


I would call gardening my obsession. Potting is my passion. I love making pots, but I couldn't live without a garden. 
The Warwickshire Open Studio Exhibitions begin in July, so I have a few weeks yet to organise my exhibition space in the downstairs rooms. And I've plenty of time for a bit more sitting in the sunshine, a slow amble to the greenhouse to check how the tomatoes are progressing, and staring into the small pond to try to see the two newts that Rosie and I have called Isaac and Mrs Newton.
The break has been excellent, but I can feel the old passion creeping up on me again. The wheel will get turning soon, and the radio will get switched on in the basement, and we'll be off again. New thoughts, new glazes, new pots.

Happy Potting Folks. 


Friday, 11 May 2012

16. It's the Show Season Again

Hello potters and friends,


No, it's not Alan - although he does have his own kilt; the ancient Graham hunting tartan. But you've guessed it - we've been to Scotland!
One of our daughters, Carrie, lives in Edinburgh with her husband Alistair, and a great time we had.


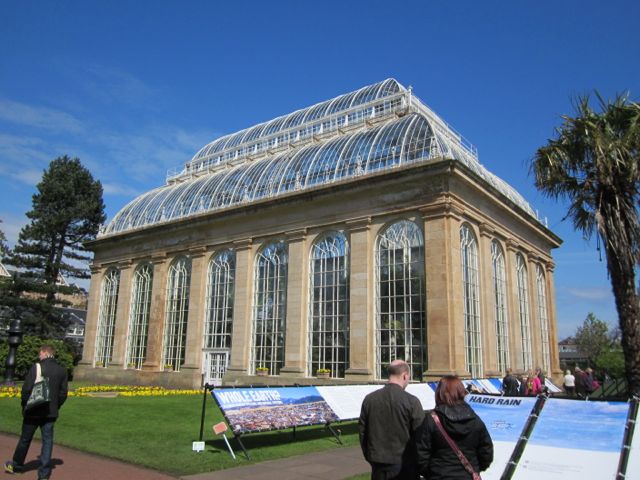
After lunch we walked down to the Botanical Gardens and took a stroll around the tallest glasshouse in the world. Yes, in the world.


After this lovely relaxing time it was straight back to the basement and preparations for two exhibitions.
The first was last weekend in Jephson Gardens Glasshouse Studio, Leamington Spa.


Not quite on the scale of the Edinburgh one but it shows our work off beautifully.

So now, it's back to the grindstone and I'm putting my mind to Warwickshire Open Studios. I don't need to make any more work but I do have to rethink the display, which will be in my home.

A phrase I read recently, spoken by the great potter, Lucie Rie, made me think differently every time I sat at my wheel. She said that form and shape is everything. A badly formed pot will never be rescued by a glaze, no matter how beautiful the glaze may be.
I'm sure we've all gone on to fire a pot we didn't like, in the hope that it would look better when glazed.
So over the past few months I have concentrated on shape and simplicity. And having this aim before I begin has definitely made a difference to the quality of my throwing.

So here are a few pieces that I regard as successful.


Leamington Bells
White Satin glaze with oxide rim.


Wide- Skirted Jug.
Dipped Blue glaze - Clear Sky from Scarva.


Porcelain Dishes.
Transparent and pale green glazes.


Whirlpool.
Green glaze with white glaze rim.

The fingers-through-the-slip technique that I've shown in a previous post. 

And finally.....


Porcelain Bobbles.

This was a last minute decision so I needed a sort of pipette to create the small bobbles, and I had to do it straight away before the pot dried out. So this was what I did.......

  
Take nice shiny wrapping paper - 10 inches square - cut it on the diagonal - keep your thumb on the centre of the longest side (this will be the pointed end) and start rolling.


Keep the point nice and tight, secure with sticky tape and trim the point to your liking (big blobs or small).


Voila! There you go. Fill with slip and start squeezing. It needs very little pressure. It can only be used once but you get 2 from your sheet, no washing up and no expense. Just how we like it.


So if you live in Warwickshire, pick up an Open Studios Brochure and trail map.
Look out for the bunting that we'll have flying from the windows and come and see what's on offer.

Happy Potting Folks.


Sunday, 1 April 2012

15. Spring Forward

Hello Potters and Friends,

Spring is truly here in England. Daffodils, tulips and our Magnolia tree (although still quite small) has caused quite a bit of jealous whispering and a few envious looks from our neighbours.


Do I look proud? I bought it as a small stick from the green-grocers 10 years ago.

And here is another proud gardener in her garden last summer.....


Rosie's roof-top garden.

Keeping up the family gardening tradition, our daughter, Rosie, has transformed her concrete roof terrace into a beautiful vegetable and flower producing garden.
If you've ever had the urge to grow your own veg' then follow her lead and turn a bare space into a thing of beauty.  Read all about it on  www.Rosiesrooftopgarden.blogspot.com  Starting from this spring through to winter.

But back to the plot.....or rather, move on from the plot!
In my last post I promised to show you the results of my clay throwing technique. 


The before.....


...and when glazed (right) plus one other.

As I predicted the glaze beautifully emphasised my finger marks.
Also last time, I showed how I overlapped my tenmoku glaze with a white satin to produce a strong ochre band. Well, I experimented with this idea.


From the kiln this week.

I used an ear-drop syringe from the chemist (plus gravity) to create the runs, by holding the pot on its side.
I think I might have also invented the drip-catching rim on the bottom. But who knows, maybe not.

So, the kiln has been getting a good workout recently, and as I stay out of my basement workshop when it's on, I took this opportunity to get back to some painting.


Acrylic on American Ammunitions Box. (The Lid)

A local second-hand shop has the most surprising things piled-up in the doorway. 15 ammunition boxes from the USA suddenly appeared last month. Who could resist them and just walk by? Not me. I was at the counter in a flash buying two of them. My plan was to take them apart and paint the flowers from my garden on them. 
Not so easy. Ammunition boxes are made to carry a great weight.        ALAN!!!!!
But even Alan had to get down the hardware shop and buy a new crowbar. But, after blood, sweat and tears and a hundred long nails later, I set up my paints on the kitchen table - my favourite spot for painting - and settled down to it.    


Nasturtiums on the end panel.


Daisies on a rough bottom.


Happy Potting and Painting Folks. 


Tuesday, 20 March 2012

14. Fresh From the Oven.

Hello Potters and Friends,

In my last post I showed you a tall vase made by joining two cylinder shapes together. Well, I'm pleased to say that it survived the glaze firing and here is the result.


If you squint very hard you can just see that there is a very nice ochre band where the two glazes meet. Here's a jug I glazed in the same way. It's much clearer here.


I'd done a small test pot first, of course, but this yellow band came as a complete surprise. The brown glaze is Tenmoku and I overlapped it with a satin white. Neither glazes run so I guessed that together they would stay stable, but I didn't know what the reaction would be. And this is going to be really useful on other work. 
Take this plate for instance.


This is wax resist brushwork under the Tenmoku glaze.

The wax has repelled the glaze, so what you see is the bare clay beneath. This is absolutely fine, but the glaze sits slightly higher than the pattern, so the plate  isn't smooth. But I could create a similar effect using the white satin glaze thrown or poured in a hap-hazard way and have a lovely smooth, ochre pattern.

Now, during February here in England we have seen some dark, grey days. And maybe because of this I started painting my pots in some very bright underglazes. 


Small porcelain dishes.


Egg cups and small mugs.

I love thinking up the ideas and painting away in my workshop while listening to BBC radio 4, but if I'm really honest, opening up the kiln to discover a perfect yellowy/ochre band when I least expected it, gives me a much bigger thrill.
So, now that spring has arrived with the daffodils and tulips bobbing about I left the cheery bright colours and I went straight back to some thing a little more primitive. 


I threw this pot as usual but before lifting it from the wheel I squirted it with liquid slurry from my slop bucket and, with the wheel slowly turning, I ran my fingers though it.


This was my squirter - a tomato ketchup plastic bottle - 3 for £1 from the £1 shop. The raised pattern should hold a coloured glaze really well. In fact, there's no reason why you couldn't squirt porcelain slip onto the stoneware or even a clay that's been coloured with an oxide. I'll definitely be giving that a whirl. 
 I look forward to showing you the finished results.....I can't wait for the thrill of opening up that kiln!!

Happy potting Folks.


Sunday, 19 February 2012

13. Throwing a Wobbly

Hello potters and friends,
Well, I've warmed up the basement and the first thing that has cropped up this year is a commission. I have agreed to make a tall vase with a flared neck. So how will I go about this? Now, between you and me, I'm not much good at coiling, so that's out, and throwing a tall pot on the wheel can be quite a wobbly affair. But, I admit, that's my own fault. I continue to make the same mistakes every time. So I'm going to start the year listening to the rules that I was taught.
Firstly, go for a grogged clay. This is a tougher body and will more easily do what you want i.e. remain upright on the wheel.
Secondly, if your clay feels too plastic, and by that I mean wet, then spend some time on a table wedging it up until the clay begins to dry a little, and feels firmer.


The method I use is called ox-head wedging, because that's what the shape tends to look like as you press down and push slightly forward. Roll the clay back a little and repeat the action. With every press down you are pressing out any air bubbles, so it's not the same as kneading pastry or bread. Let that ox head know who's in charge.
However, I didn't want to use grogged clay. I wanted something whiter and smoother that would fit better with the white glaze I intend to use.
My solution to this was to throw two pots; one as a straight cylinder and the second the same but with a flared top. At leather hard stage I put one on top of the other, with lots of slurry in-between and, 'Bob's your blooming' uncle'......a tall vase with flared top.


The pencil points to the join.
 I'm hoping you can't see it, because I've rubbed it down with fine sand paper before firing. No-one would ever know. You could join three or four and get something really spectacular. Height of kiln permitting!

To go to the other extreme ......I'm still making very small pots with the porcelain clay. 


But I'm getting more of a feel for it now. I wedge this clay like crazy before throwing and, boy, does it make a difference. And you may have guessed, that I shaped the rims into this great-looking, tri-tipped form because I couldn't get them level. But from an accident, like so often in pottery making, comes a good idea. 
But before I close this post you might like to see why I'm warming up the basement for half an hour before venturing down there.

  
Our garden from an upstairs window.


But our friend visits every morning to fight off every other visitor, large or small, that dares to steal his breakfast.

Happy potting folks.